INTRODUCTION
Healing as a stamina warden is both simpler and more challenging than healing as a templar. Your kit is smaller with only a select few healing spells, and you have to keep more independent buffs up, but you make up for it with a level of burst healing that a templar can only output in some specific circumstances with builds that have among the highest of skill caps.
GEAR
Your front bar needs to be two daggers, as the Dual Wield passive Twin Blade and Blunt for daggers increases your critical strike chance.
Your back bar will be a bow if you’re using Bombard, or a 2H Maul (Master’s, perfected preferred) if using Carve. See the section on the back bar’s skills for that decision.
I recommend the Swift trait on at least two of your three jewelry to ensure that you have the speed to maintain appropriate positioning outside the group for better coverage of Soothing Spores.
| The key to stamina warden healing is your critical strike percentage. You need to increase it to somewhere between 60% and 80%, while maintaining sufficient stamina regeneration to keep your skills usable for the duration of a standard engagement (ask your raid leader what that time is, usually between 30 and 60 seconds). Considering the requirement for critical strikes on healing, Leviathan is going to be your base set. This provides one maximum stamina bonus, with the rest being critical chance. |  |
| You may want a second 5-set bonus that provides a buff to the group such as Powerful Assault. This will proc on your Echoing Vigor casts, hitting six allies every cast. A maximum of twelve targets may have your 10 second HoT (Heal over Time) at any given time. |  |
| If your group’s style will require you to spam more big heals for a longer fight duration, then Battlefield Acrobat is a great option. |  |
| If you want to maximize your raw healing, Briarheart will add critical strike chance and a significant amount of weapon damage. It will also heal you for extra when you critically strike (heal) others! This set requires that you damage someone to proc it, so you will need a ranged skill that can critically hit at least once every 15 seconds. Using a bow with bombard on your back bar, or using the caltrops skill are simple methods of keeping the buff up. | 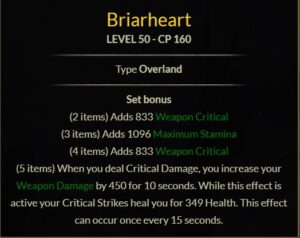 |
| For your monster set (head and shoulders), your best option is Nightflame. The 1-set bonus of maximum magicka is not optimal, though you will still be using magicka, and your stamina regeneration should be quite high, so this is not a wasted stat. Nightflame will drop a totem that heals allies every second for 10 seconds, and as long as you keep healing it will keep dropping on cooldown (every 10 seconds). The amount of the heal is not as high as many HoTs, but it’s consistent, and can be the difference between someone dying and getting out of a negate or cc with very low health. | 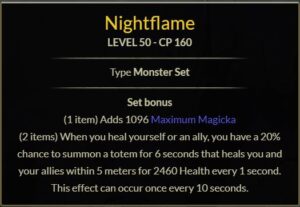 |
| A common alternative monster set is Earthgore. Earthgore is valued not so much for the heal, but for the ground effect removal when it procs. The challenge with Earthgore is that it will often proc at the same time if multiple healers are using it, potentially wasting all but the first one. This set should be on a healing class that outputs the most consistent and regular HoTs and heals, so if you have templar healers in raid, you probably won’t be running this. | 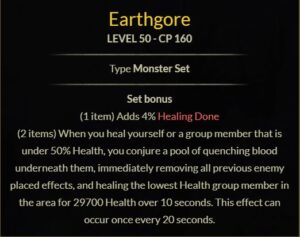 |
| Troll King is another solid set that is very often discounted in favour of others. While Nightflame is almost always a better choice, the extra health recovery is equivalent to another HoT, and helps the group by increasing passive healing without being limited by location (as the totem is). For highly mobile smaller groups who are planning to farm a tower, or the top floor of a keep, Troll King is very viable (though this build is less so). | 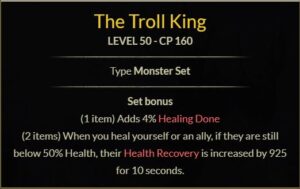 |
| Bloodspawn is a very good option, as it comes with stamina regen, and will give you 13 ultimate every time it procs (quite often in combat). This will allow you to cast even more Healing Thickets. The set you likely use will be a toss up between Nightflame and Bloodspawn. | 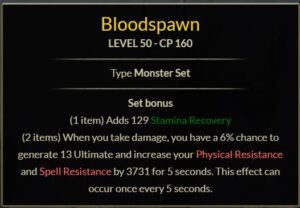 |
CONSUMABLES
As usual, I recommend that both bars have poisons, specifically the 4.4 second Immovable poison on your ranged bar (if you have one), and the 3.9 second Immovable poison on your melee bar.
Bewitched Sugar Skulls is likely the best choice for food, as it provides all three stats with some health regen.
Potion preferences are up to the individual, though the staple Health/Stamina/Immovable and Health/Lingering Health/Invisibility as well as something with Minor Heroism (for ultimate regen) are nice to keep slotted.
SKILLS
The front bar skills that are most appropriate are as follows:
- Echoing Vigor. This is the staple HoT (Heal over Time) that you need to cast twice every ten seconds. This HoT is limited to twelve targets, and applies to six targets every cast. Note that the application is capable of overlapping, so if you have a free cooldown available casting it again is not necessarily a wasted cast.
- Soothing Spores. This is your big / burst heal. Like most stamina skills, it can be cast while silenced, so while your templar and magicka warden raid healers are trying to get out of a silence, you can laugh your way through spamming some enormous critical heals.
- Camouflaged Hunter. This skill is on your bar to provide major savagery, which increases your critical strike chance. It’s also nice to detect stealthed opponents. An alternative to this skill is Green Lotus. I prefer Camouflaged Hunter as it applies the critical strike bonus as a passive as long as it is slotted without needing to spend a cast cycle for it. If you want the buff available while on both bars, then use Green Lotus on your back bar, and another skill in this slot.
- Shuffle. Shuffle will give you immunity from snares for five seconds (assuming you’re using 5 pieces of medium armour), and must be on your front bar.
- Deceptive Predator. Deceptive Predator provides you with Major Expedition for 6 seconds. It also provides Minor Evasion, reducing damage from area attacks. If your group has someone whose responsibility is to maintain Major Expedition (such as a stamina sorcerer spamming Charging Maneuvers, this this skill may be replaced, though consider that in order to cover everyone perfectly with Soothing Spores you will need to be outside the group, and thus will usually need Major Expedition more often. Even with someone keeping up Charging Maneuvers, Minor Evasion has tremendous value in allowing you to stay in an otherwise untenable position to get one more Soothing Spores off from a perfect position to save your group.
- Healing Thicket. A lower cost and high value healing ultimate – what’s not to love? While the other morph (Enchanted Forest) will almost always give you an extra 20 ultimate on cast (lowering the time to your next cast), Healing Thicket’s HoT will remain on players for 4 seconds once they leave the area of the effect – which will often coincide with a bomb, so those extra 4 seconds of healing will often save a life.
 |
 |
 |
 |
 |
 |
| Echoing Vigor | Soothing Spores | Camouflaged Hunter | Shuffle | Deceptive Predator | Healing Thicket |
Your back bar has one variable slot that will usually either be Bombard or Carve, then the rest are utility and buffs:
- Bombard, Carve, or Corrupting Pollen. If your buffs are up, Echoing Vigor has been cast twice, and there’s no need for burst healing, Bombard your opponents to snare them. If Bombard is already covered by someone else, or your opponents are using Snow Treaders (preventing snares or slows from affecting them) Carve with a Master’s Perfected 2H is a great option should your group wants more killing power vs large stacks. If you don’t already have a source of Major Defile for the group, then Corrupting Pollen is a great source for applying the debuff to opponents, though the Champion Point layout may change with more points in Befoul.
- Turn Evil. Minor Protection (8% reduced damage) while standing within the effect (on a ram, a flag or in a choke) is very powerful if you don’t otherwise have it available. The true value of this skill is in applying fear to opponents. The other morph, Ring of Preservation, provides a HoT while standing in the effect. For groups that are stationary, this may be helpful, though for those with high mobility Turn Evil is the best choice.
- Bull Netch. This buff gives you major brutality for extra weapon damage, removes 1 negative effect from you every 5 seconds, and most importantly restores stamina while active.
- Expansive Frost Cloak or Ice Fortress. Both of these skills apply major resolve increasing physical and spell resistance for twelve players in your group. Expansive Frost Cloak has a range of 28 meters, and Ice Fortress has a range of 8 meters but also gives you Minor Protection, reducing your damage taken by 8% for 24 seconds. Your group should have one warden with Expansive Frost Cloak for every 12 players in the raid. If you will be playing with a style of staying outside the raid for maximum dispersal of your Soothing Spores (20 meter range), then the assurance of having minor protection is significant in keeping you alive and in position. If your raid doesn’t have enough wardens (one for every twelve players), then you’ll need to use Expansive Frost Cloak.
- Shimmering Shield. While each cast protects you from 3 projectiles, the significant value in this skill is the application of Major Heroism for 6 seconds (when hit), granting you 3 ultimate every 1.5 seconds. A big part of your effective healing will be your Healing Thicket ultimate, and this will bring it back up much quicker.
- Reviving Barrier. Your barrier will often be larger than that of magicka classes. Your raid leader may call for your barrier before entering a breach, as your Healing Thicket will be available very quickly – whereas other healers may take longer to get their ultimates up.
 |
 |
 |
 |
 |
|
| Bombard, Carve, or Corrupting Pollen | Turn Evil | Bull Netch | Expansive Frost Cloak or Ice Fortress | Shimmering Shield | Reviving Barrier |
PLAY STYLE
Here is the logic behind what I cast and prioritize for standard Cyrodiil medium (12) to large (24) group scenarios. The lower the number of the line, the higher the priority, so for every cast you could start at the first option, if that’s not needed, consider the second, if that’s not needed consider the third, etc.
- If your group has many players with less than half health, Reviving Barrier. This will protect them while you and your burst healers get them back up to full health.
- If you see significant incoming damage, Healing Thicket. The area HoT may be negated, but it will still last four more seconds.
- If there are players missing 25% or more health within the area of your cone, Soothing Spores.
- Keep two casts of Echoing Vigor up every ten seconds.
- If you are slowed or snared, or are about to run through a slow or snare, Shuffle.
- Ensure that your Major Resolve buff is up, Expansive Frost Cloak or Ice Fortress.
- Keep Bull Netch up. You need that stamina regeneration.
- If you need major expedition to keep up, catch up, or get into position, Deceptive Predator.
- If your ultimate is not up, and there are players or NPCs who will attack you, Shimmering Shield.
- If there are multiple opponents within five meters who do not have crowd control immunity, or you have allies standing in a high damage area (such as on a ram) who could use 8% damage mitigation, Turn Evil.
- Conditional skills depending on what weapon is being used on the back bar:
- While using a bow back bar, if there are opponents in range who are not immune to snares, Bombard.
- While using a 2H back bar, if there are opponents in range who are not dead, Cleave.
- If you have nothing better to do and there’s someone stealthed, Camouflaged Hunter.
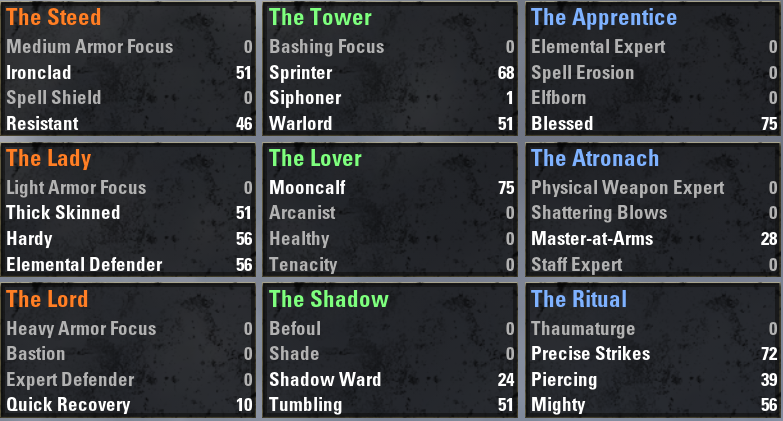
CHAMPION POINTS
You can see my suggested champion points for this build in the screen capture below. This CP layout is meant for high healing with some damage capability as well.